Hello!
Today is release day at Taylored Expressions!
Taylor's new release features a product she's been working on for quite a long time.
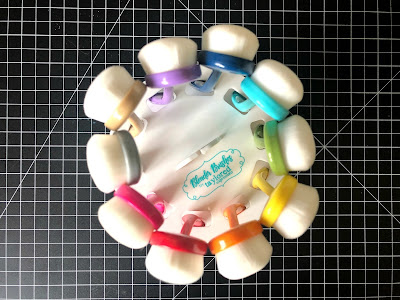
Ink Blender Brushes with soft, velvety white bristles!
These brushes come in a set of 10 identically sized brushes, with color coded handles, so it's easy to tell which color you are working with! And there's no real need to clean them, but instead just wipe any excess ink off onto a dry towel before putting away!
There is a super cute spinning rack to hold them all too!
The spinner carousel comes in four easy to assemble snap together pieces. (I did add a bit of glue when I assembled mine, as I plan to store mine in a cabinet above my work space, and wanted it to be very secure as I moved it to and from my workspace.)
The colors are so, so pretty when assembled and stored in their ROYGBIV glory! It's like a carousel of crafty color!
This set of brushes was a gift; it's a little sneak peek at one of the products that Taylor will be using in her classes this week at my Junkie fest 2019 event in Minneapolis. I'm very excited she's in town, and can't wait to see her class projects on Thursday!
I decided to get my first brush inky with a stencil to create a very quick and simple card.
Using a white top fold card base on my Water Media Mat, I very quickly created an airy background by brushing in Salt Water Taffy ink over the Set the Scene - Clouds stencil strips. I started at the top of my card, lightly brushing ink up from the edge of the stencil strip. I used a second strip slightly lower, inking very faintly, then continued down my card, twisting, turning and finally flipping the stencil strip to create a varied cloud bank with a puffy lower edge as well. The ink application was quick and very smooth with these brushes, and took only a minute or two.
I used my MISTI to add the Walt Disney dreams quote from Plot Twist with Sprinkles ink.
Easiest card ever!
I made a second, slightly more elaborate stenciled card as well.
I used a circle die to create a template that fit over my A2 top fold card base. I wanted to create a birthday card using the little bear from Look Who's Talking. and have him peeking out from a hole in the wall.
I placed the stamp over my circle, so that his ear would be outside the circle.
I picked up the stamp and inked up just the tiniest edge of his ear and stamped it onto the template. This showed me where I needed to trim away to allow the full ear to stamp. I also added a very faint pencil line inside the circle.
I stamped the bear. and also stamped a second time onto masking paper before removing the template. I then trimmed out only a small portion that would protect that ear and added it to my image.
Now with that ear covered with the mask, I added the circle I'd diecut from that template with temporary adhesive. I used the pencil line as a guide for placement.
Next I added the Polka Party stencil and inked in a rainbow of dots using the Blender Brushes. I used Guava, Candy Corn, Pineapple, Green Apple, Cookie Monster and Plum Punch inks. It was great to not have to clean a brush between colors, but rather just reach for the the color family brush!
I removed the stencil and masks.
And colored my bear with Copic Markers.
Once colored, I once again added that circle mask, and using a Copic Multiliner, drew a line around the circle to define it, taking care not to cross that ear.
Now I filled in the background of the circle. I'd used YG25 but decided it was a bit too bright, so I added YG over the top to tone the color down a bit to match the Green Apple ink.
Now I wanted to use the birthday greeting from The Inside Scoop - Belated Birthday. but I wanted to used only half on the front of my card, the other half on the inside of the card. Once I had placed my stamp in my MISTI, I covered the portion I did not want with a piece of Purple Tape before inking.
That tape protected the lower portion from ink, so once removed, I would only stamp the portion I wanted onto my white cardstock.
I trimmed out the sentiment using my Cut-Align tool and a craft knife.
Before adding my sentiment to the front of the card, I used the same process with tape on my clean stamp to add the lower portion of the birthday greeting to the inside of my card.
Finally I added my sentiment to the front of the card with foam tape.
These Blender Brushes and the Storage Caddy are available for purchase at Taylored Expressions today. Taylor even has a free gift with purchase of the Blender Brushes and Storage Caddy, and free shipping with a $50 order through June 30th too!
Happy crafting everyone!


No comments:
Post a Comment