Hello! This is post number two for today: Part two of my Concord & 9th September Release Feature Friday. If you'd like to see the post which features the Merry Shapes Bundle, please click HERE.
This post features the Mistletoe Messages Bundle. This bundle includes the Mistletoe Magic stamp set which is a 3"x 4" set full of small holiday greetings that are perfect for cards and tags:
and the Mistletoe Messages Dies, which includes the large Mistletoe sprig, berries, a string bow and a double ended banner die sized for all of the stamp set sentiments.
My first project uses the Mistletoe die, both for the ivory die cut, and the negative from that diecut used as a stencil to ink the Mistletoe image onto my card panel with Tea Dye Distress Oxide ink.
I added the ivory die cut and layered the gold berries, cut from the gold foil paper from the Neutrals Foil Paper Pack to my inked panel. The panel was trimmed down to 3 1/2" x 4 3/4" and layered with a dark brown cardstock, a striped patterned paper and the gold foil before adhering it to a folded cardbase. The sentiment was heat embossed in ivory onto the dark brown banner strip and added right-justified to the card.
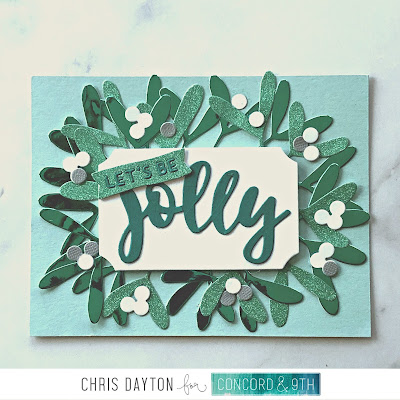
My next card uses the Mistletoe dies once again. This time, I die cut the Mistletoe sprig multiple times from the green foiled paper from the Holiday Foil Paper Pack, as well as some pale green glitter paper. I snipped the die cuts apart, into mini sprigs which I arranged to fit beneath the frame die from the Holly Berry Dies. The berries were die cut from white and gray cardstock and added randomly amongst the sprigs.
I used the Jolly Dies to cut dark teal cardstock and the pale green glitter paper to cut the tiny banner and the large word. The teal letters were inlaid into the glittered banner before adhering to my card.
For my final card, I used the tiny snowflake, one of the sentiment stamps and the banner die along with one of my older stamp sets in my collection. These sentiments can give new options to many of your other holiday and winter themed sets. Here, I used the Let It Snow sentiment to along with the large snowflake from Snow Flurry. I had heat embossed the large snowflake with clear embossing powder onto a white cardstock panel. I then inked the panel with Blueprint Sketch Distress Oxide ink. I added spritzes of water to lift some of the ink with a paper towel. I also splattered some white acrylic paint to add tiny snow specks. When my panel and paint were fully dry, I also stamped the tiny dainty snowflake randomly over the panel using white pigment ink.
Once that ink had dried, I trimmed the panel to 4 1/8"
x 5 3/8" and adhered it to a white cardbase. I added the sentiment banner strip with foam dimensional tape, and also added a few gems.
I also used the banner strip and Noel sentiment on a card in THIS post today which features the Merry Shapes Bundle. Please feel free to check that post out too!
Two other guest designers are featuring the Merry Shapes and Mistletoe Messages Bundles today also. Please visit Emily and Sara by clicking their highlighted names.
That's all from me today! Come back next Friday for more Feature Friday posts.
Have a fantastic weekend!


No comments:
Post a Comment