Tuesday, December 10, 2019

Taylored Expressions Blender Brush Blog Hop!

Hello!  

Today I'm excited to have been invited to participate in a Taylored Expressions Blog Hop featuring her awesome color-coded Blender Brushes.  These brushes are fantastic.  They come in a set of ten 1-1/2" wide, velvety-soft, bristled brushes.  The sturdy handles are colored, so you can keep one brush specifically for each color family.

I actually have two sets of these brushes in caddies on my desk.  I have one for my dye-based inks, and one for my pigment-based inks.  I now never have to worry about mixing up ink formulas!


Taylored Expressions has a special gift guide and a holiday gift promotion happening right now.  You can find all the details on Taylor's blog HERE.


I'd like to share a few projects with you today.  The first is a rather simple emboss-resist holiday card. 


To start, I used my Original MISTI and Versamark ink to stamp the Twinkle Twinkle Background onto an A2-sized panel of white cardstock.


Then I heat-embossed it with clear embossing powder.


I then applied Potato Chip ink to the lower center of the panel with a brush.


Next, I added Blue Corn, slightly over-lapping the yellow, to create a warm glow in a night sky.  I used a dry micro-fiber towel to wipe off any excess ink from the embossed stars.


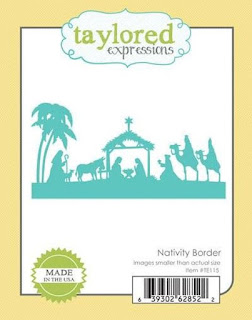
I used the Nativity Border die to cut my focal image die cut from black cardstock.


Now I heat-embossed my sentiment onto my die cut.  I used a piece of Dritz quilting template plastic that I've cut down to fit inside my MISTI.

By stamping the sentiment first onto the plastic sheet (which was tucked securely into the corner of my MISTI), I could use that stamped image to line up my die cut behind the plastic sheet.  Once I was happy with the placement and alignment, I secured the die cut with a magnet, removed the plastic sheet, and stamped to my die cut and embossed.


I adhered the die cut to my panel, first checking my inking.  I did decide to add just a bit more Blue Corn ink so I could shrink the size of my yellow glow.  I wanted the glow, to appear somewhat contained within the manger image.  I also added one white, prominent star die cut to my sky.

My next project was a self-imposed coloring challenge.  I wanted to see if I could create the majority of a card using only die cuts.  But, my self-imposed challenge was to add dimension and shading to a plain WHITE die cut, using only a blending brush.  I needed to do all the coloring myself with a Blender Brush.

This part was rather easy: I'd cut several Pine Clippings, and had inked them up with Cilantro and Poblano inks.


Then, I opened the All is Bright lantern die that I had purchased weeks ago, but hadn't gotten a change to use yet.


I realized that there's a matching stamp set that can do nearly the same thing as I was attempting.  


But this was the challenge I'd set for myself, and I was going for it.

This lantern die cut was the perfect focal image to color.  It took me a bit to visualize how I would be able to shade this image, but as I studied, I realized that the guide and the tool I needed was right in front of me:

The piece from the cut-out window!  I almost tossed that away!

Those angles on the die cut window negative are the same angles that are carried out throughout the whole lantern!  I'd found a perfect masking piece to protect areas I wanted to keep a bit lighter while I added ink to others.  I was able to turn the "masking piece" in whichever direction necessary to find the correct angles that matched up with areas of my lantern!


I ended up with this lantern and pine clippings which I added to an inked cardbase.  I added the sentiment after my card was assembled, using the same Dritz plastic template that I showed above. 


I had so much fun making that lantern that I had to make another.

And another.

And another.

I actually made a LOT of them in many different colors.  After the first three or four, I'd learned how to color the lantern quite quickly.  I'd gotten it down to about 3-4 minutes per lantern.


I made a little color chart of the Taylored Expressions ink colors I used for these:


And I turned my video camera on, in case you are interested in watching a 6+ minute video on coloring this bronze-colored lantern:


Thanks for stopping by today!  Please visit all of today's hop blogs!  They are all listed below.  Remember to find the holiday gift guide and promotion info on the Taylored Expressions blog.

Happy hopping!

Chris Dayton  (You are here)
Dina Kowal (go here next)

Monday, December 9, 2019

Winners from my Growing in Unity Week (Nov 25-29)

Hello!  Happy Monday to you!

I'd like to thank you for all of your sweet comments from my Growing in Unity week.  You were so kind.  I appreciate your support so very much.

Today I'd like to announce the winners of the two prize packs of Unity Stamp Company's fabulous red rubber stamps.


Crissy and Sandee, please email me at chris@junkiefest.com to claim your prize.  Please put GIU Winner in the subject line, and include your mailing address in the body of the email.

Thank you Unity Stamp Company, and thank you to all of you!

Friday, November 29, 2019

Growing in Unity: Day Five

Welcome to Day Five, the final day of my Unity Stamp Company Growing in Unity week.  I've been sharing projects all week that feature Unity's high quality, red rubber stamps.  If this is the first day you've joined me, please scroll through the previous posts!  If you are a returning visitor, thank you, and welcome back.  Be sure to leave a comment on this week's blog post to be entered for a chance to win one of two fabulous prize packs from Unity Stamp Company.  Winners will be announced on this blog and on the Unity Stamp Company Growing in Unity Facebook page after December 7th.

I hope you had a wonderful Thanksgiving Day!  In between food and football, we decided to put our Christmas tree!  It was more fun than usual to do that this year.  We were traveling last year at Christmas, so I never put it up at all.  So now, I'm really in the winter and holiday spirit!  (But not enough to brave the malls to go Black Friday shopping. I haven't done that in years.) . But we are all decorated for tomorrow's family post-thanksgiving party.

Since it's now the official winter holiday season, and the weather is transitioning to snow, I have a day full of snowmen to share with you today.  

My first snowman comes from the stamp kit, Winter Frosty.  


This image was stamped on Fabriano Artistico cold press watercolor paper, and watercolored using Distress ink.  


On this card, I decided to split my greeting.  I loved how well this sentiment from the October 2017 S.M.A.K. Kit, Winter Wild, seemed to fit with this snowman from Twinkle, the January 2017 Kit of the Month.


 I used my Dritz quilting plastic template to help me align my sentiment, so I could easily mask half at a time so I could add the first phrase to the front of my colored pencil colored image, and the second phrase to the interior of my card.


 I used both Copic markers and colored pencils to color this sweet snowman image from the September 2018 Kit of the Month, Blessed Fall.


I used my Cut-Align and a craft knife to cut my small sentiment strip from my panel, and a scissor to fussy cut my image out before highlighting it with a circle of snowy patterned paper.


My final card this week uses the snowman from the October 2019 S.M.A.K. Kit, All Bundled Up.  


I wanted to create a very vintage holiday card look, so I used watercolor paper, and a special inking process with my MISTI to create the colorful image with Distress ink.


I used small fingertip sponge daubers to pick up ink from my ink cubes and apply it selectively to areas of my stamp.  It took several layers of ink to build up enough ink on my textured watercolor paper.  Once I had enough ink transferred, I used a slightly wet paintbrush to spread the ink.  I was careful to work only one color at a time and let it dry well before starting another.

I used additional distress ink from my makeshift craft pad palette to darken areas of my image, as well as paint my background.  I used an acrylic stamp block to add the small snowflakes from Wonder, the November 2019, S.M.A.K. kit.  The sentiment was added in black ink, and stamped again and heat embossed with clear embossing powder.


As they say in show business, "that's a wrap!".  This concludes my Growing in Unity week.  I'm grateful for Unity Stamp Company for this opportunity, for all your kind comments, and for you spending a portion of your days with me.

Please come back in a bit over a week to find out if you are one of the Unity Stamp Company prize pack winners from my week!

Have a fantastic weekend!


Thursday, November 28, 2019

Growing in Unity: Day Four

Happy Thanksgiving Day everyone!  Thanks for spending a few minutes of your holiday with me.  I appreciate you sharing your time with me.  Even though the snow has messed up lots of travel plans for many people, it is kind of pretty.


Today is Day Four of my Growing in Unity week.  I am sharing five day of posts featuring projects created with Unity Stamp Company red rubber stamps.  I'm so thankful for the great people at Unity Stamp Company for their amazing products and for giving me this opportunity to share my love of Unity Stamps this week.

Unity Stamp Company has also given me two prize packs of their deeply etched red rubber stamps to give away after the conclusion of my Growing in Unity week.  If you would like a chance to be the recipient of one of these prize packs, please leave a comment on one, or all of my Growing in Unity posts this week.  Winners will be posted on this blog, and on the Unity Stamp Company Growing in Unity Facebook page after December 7th.

In honor of the first measurable snowfall, I decided to finish an image that I had started at the past weekend's swim meet.  Painting sure helps fill the time between my son's events! I bring a small lapdesk with me, so I have a little workspace.


I had stamped this panel of Fabriano cold press watercolor paper with the image from Winter Girl, illustrated by Angie Blom.  I used Fade Out ink, and using my Original MISTI, carefully selectively inked only the girl, leaving off the snowflakes.  I gradually layered Daniel Smith watercolors with a waterbrush, letting each layer dry before adding another.


Eventually I ended up with the depth of color that I was looking for.  Yesterday, I finished my card by splattering a bit of white acrylic paint over my painted area, adhering my watercolored panel to a top-fold card base and adding a sentiment strip, using a white heat embossed sentiment from Owl Bundle Up.

My husband, son and I are having a small, quiet, non-turkey Thanksgiving celebration today as my adult children either working or spending this holiday day with their in-law family.  We will be celebrating together on Saturday instead.

Today, I'd like to also share a few snowy projects that use images from the Unity S.M.A.K. Kits.  S.M.A.K. stands for Scrapbooking, Mixed media, and Altered art Kit.  The S.M.A.K. kits are one of Unity's subscription programs.  As a subscriber, you will receive a large full sheet of rubber stamps, that are perfect for many uses.  The images contained in these kits are in general, a bit larger than those in other Unity stamp kits, and often include larger sentiments and images that are perfect for backgrounds.

This is the current Kit, Beauty of Life, and I have created two cards using the large script font sentiments.


My first card uses an emboss resist technique.  I used my Original MISTI to stamp the large snowflake onto the left side of my white cardstock panel with clear embossing ink.  I used clear embossing powder and heat embossed the image.


I added some pale blue and gray ink to the panel with a blending brush.

I placed the sheet music background stamp, (also from Beauty of Life), near the center of my Original MISTI lid and stamped it in gray ink onto a sheet of Dritz quilter's template plastic, which I have cut down to fit into my MISTI.  I tuck the sheet of plastic 
firmly into the corner of my MISTI,

This plastic template is flexible, so I am able to slide my embossed panel behind that plastic template to see my alignment.  Once I like the placement, I can secure my panel with a magnet, then completely remove the plastic template and stamp.  

I then replace the template in the corner of my MISTI once again, and rather than having to more my stamp, I can just move my cardstock panel!

I did this three times, so that my card panel was covered with the subtle music background.


I used a soft microfiber towel to dab/wipe away any excess ink that remained on top of my embossing.

Next, I added my greeting.  

The Simply Blessed greeting that is included in this kit is very large.  Too large for my horizontal A2 sized panel.  So I did a bit of stamp surgery.  I simply snipped it in two, separating the words.

Now I set about deciding how to align my words.

Starting with the word Blessed, I once again used that quilter's template to decide the alignment before stamping in gray oxide ink.  By stamping first on the template, and just moving my cardstock behind the template, I am able to decide exactly where I would like my word to fit within the points of the snowflake easily.  Once I like the placement, I secured my card panel with my bar magnet and stamp.  

Since red rubber stamps are obviously not clear, I use this plastic template often to double check my alignment before I commit ink to paper.  Especially when adding my sentiments to panels I've spent considerable time coloring images.  It sure has spared me a lot of "OH NO!" moments!  

Now I wiped the ink from my template, and repeated with the word "Simply", as well as with the line which reads "to have you in my life" which I stamped and heat embossed with silver rather than stamping in gray ink.


I added a dusting of "snow" on top of my Simply Blessed with a white gel pen.


I snowflake and a pretty script-y sentiment stamp from the November 2019 S.M.A.K. Kit for my card as well.  This time, I stamped the large snowflake, as well as the smaller snowflakes, in a light blue ink and added just a bit of pale gray ink with a blending brush to create more contrast to my white cardstock before adding the beautiful sentiment in silver embossing powder.


I used a frayed edge rectangle die to trim down the panel before adding it to my top-fold card base.


That's all for today.  Join me tomorrow for my final Growing in Unity post.

Now go eat some pie, and take a nap!
Happy Thanksgiving!